OAuth 2.0 is an authorization framework standardized as RFC 6749 by the IETF (Internet Engineering Task Force) in 2012, designed to allow users to grant third-party applications limited access to their resources without exposing their credentials (passwords). It is currently adopted as the standard for social login and API authorization by most major internet services including Google, Facebook, GitHub, and Twitter.
The Origins of OAuth
The Problem OAuth Solves
Before OAuth, users had to directly provide their usernames and passwords to third-party applications, which created serious security risks. Users had no way to know which applications would safely manage their credentials, nor could they granularly control access permissions or revoke them at any time.
OAuth 1.0 was the first open authorization standard created in 2007 through collaboration between Twitter and several other companies, but it failed to achieve widespread adoption due to implementation complexity and demanding cryptographic signature requirements. To address these issues, OAuth 2.0 was released in 2012, abandoning backward compatibility with the previous version in favor of simplicity and flexibility, and significantly reducing client implementation complexity by relying on transport layer security through HTTPS.
Core Components of OAuth 2.0
Role Definitions
OAuth 2.0 defines four roles, and understanding how each role interacts during the authorization process is key to grasping the entire protocol.
| Role | Description | Example |
|---|---|---|
| Resource Owner | An entity capable of granting access to protected resources, typically the end user | A user with a GitHub account |
| Client | An application accessing protected resources on behalf of the Resource Owner | A web application supporting GitHub login |
| Resource Server | A server hosting protected resources that accepts requests using access tokens | GitHub API server |
| Authorization Server | A server that authenticates the Resource Owner and issues access tokens after obtaining authorization | GitHub OAuth server |
Distinguishing Authentication and Authorization
OAuth 2.0 is an Authorization Protocol
OAuth 2.0 is fundamentally an authorization protocol, not an authentication protocol. Authentication is the process of confirming “who you are,” while authorization is the process of determining “what you can do.” OpenID Connect (OIDC) is what adds an authentication layer on top of OAuth 2.0.
Grant Types
OAuth 2.0 defines several Grant Types to support various use scenarios, with each type designed for specific environments and security requirements.
| Grant Type | Use Environment | Characteristics |
|---|---|---|
| Authorization Code | Server-side web applications | Most secure, supports Refresh Token |
| Authorization Code + PKCE | SPA, mobile apps | Secure authorization without Client Secret |
| Client Credentials | Server-to-server communication | Client self-authentication without user involvement |
| Device Code | Smart TVs, IoT devices | For devices with limited input capabilities |
| Refresh Token | All environments | For access token renewal |
The Implicit Grant and Resource Owner Password Credentials Grant have been officially marked as deprecated in the OAuth 2.1 draft specification and should not be used in new implementations for security reasons.
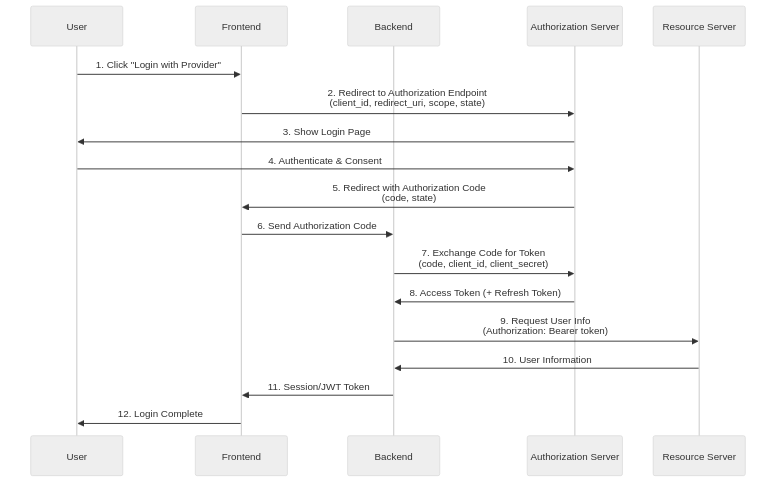
Detailed Analysis of Authorization Code Flow
Authorization Code Flow is the most secure OAuth 2.0 flow for confidential clients and is used in web applications with backend servers.
Step 1: Application Registration
Before starting the OAuth flow, developers must register their client application with the Authorization Server, providing the application name, homepage URL, and Redirect URI (Authorization Callback URL). Upon completion, the Authorization Server issues a Client ID and Client Secret. The Client ID is a public identifier that can be used in the frontend, but the Client Secret must never be exposed in client-side code and should only be securely managed on the backend server.
Step 2: Authorization Request
When a user clicks the “Social Login” button, the client redirects the user to the Authorization Server’s authorization endpoint, including several important parameters in the request. The client_id is the client identifier issued during registration, redirect_uri is the URI where the user will return after authorization, and response_type=code indicates that an Authorization Code is being requested. The scope specifies the scope of permissions being requested, and state is a random string to prevent CSRF attacks that must be returned unchanged in the authorization response.
Step 3: User Authentication and Consent
The Authorization Server requests the user to log in (if not already logged in), displays the permissions (scope) requested by the client, and asks for consent. When the user consents, the Authorization Server generates an Authorization Code and redirects the user to the specified redirect_uri with the authorization code and state value included as URL query parameters.
Step 4: Token Exchange
The client’s backend server submits the received authorization code to the Authorization Server’s token endpoint to exchange it for an access token. This request must be performed on the backend because it includes the Client Secret, and the authorization code is single-use with a very short validity period (typically 1-10 minutes), making it difficult to exploit even if intercepted.
Step 5: Token Response
Upon successful validation, the Authorization Server issues an access token, typically returning the token type (Bearer), expiration time (expires_in), permission scope (scope), and optionally a Refresh Token.
Step 6: Resource Access
The client includes the issued access token as a Bearer token in the HTTP Authorization header to call the Resource Server’s API, and the Resource Server validates the token before returning the requested resource.
PKCE (Proof Key for Code Exchange)
What is PKCE?
PKCE (Proof Key for Code Exchange, pronounced “pixie”) is an OAuth 2.0 extension defined in RFC 7636, originally designed to prevent authorization code interception attacks in mobile apps, but now recommended for all public clients including SPAs. In OAuth 2.1, PKCE usage will be mandatory for all client types.
PKCE works by using a dynamically generated secret to link the authorization request and token request. The client first generates a high-entropy random string called the code_verifier, hashes it with SHA-256, Base64URL encodes it to create the code_challenge, and includes it in the authorization request. During the token request, the original code_verifier is sent along, and the Authorization Server hashes it to compare with the stored code_challenge to verify the request’s authenticity. This mechanism prevents attackers who intercept the authorization code from obtaining tokens.
Role Distribution Between Frontend and Backend
Frontend Responsibilities
The frontend is responsible for redirecting users to the Authorization Server’s authorization page, generating and storing a state value for CSRF prevention, and if using PKCE, generating and securely storing the code_verifier. After authorization completion, it extracts the authorization code from the callback URL and passes it to the backend, verifying the state value to confirm response integrity. Properly storing and managing access tokens or session information received from the backend is also the frontend’s responsibility.
Backend Responsibilities
The backend handles the most security-sensitive operations in the OAuth flow, securely storing the Client Secret and never exposing it to clients. It submits the authorization code received from the frontend to the Authorization Server’s token endpoint to exchange it for an access token, then uses the issued token to query user information from the Resource Server. Based on the retrieved information, it creates user accounts in its own system or links to existing accounts, and issues its own authentication session or JWT to return to the client.
Security Considerations
Essential Security Measures
There are security measures that must be followed when implementing OAuth 2.0. All communications must occur over HTTPS; using HTTP allows tokens and authorization codes to be intercepted on the network. The state parameter must be a cryptographically secure random value, stored in the session and verified on callback to prevent CSRF attacks. The redirect_uri must exactly match the pre-registered value, and wildcards should not be allowed to prevent open redirect vulnerabilities.
Token Security
Access tokens should be set with short validity periods (typically 15 minutes to 1 hour) to minimize damage even if tokens are stolen, with Refresh Tokens used to obtain new access tokens. Refresh Tokens should be stored in cookies with HttpOnly, Secure, and SameSite attributes set, or kept in backend sessions; storing them in browser localStorage or sessionStorage makes them vulnerable to XSS attacks.
Principle of Minimum Scope
Requesting only the minimum permissions required by the application is a fundamental security principle. Excessive permission requests not only reduce user consent rates but can also lead to greater damage if tokens are stolen, so only necessary scopes should be selectively requested.
OAuth 2.0 vs OpenID Connect
| Aspect | OAuth 2.0 | OpenID Connect |
|---|---|---|
| Purpose | Authorization | Authentication + Authorization |
| Tokens | Access Token, Refresh Token | Adds ID Token |
| User Information | Requires separate API call | Included in ID Token or UserInfo endpoint |
| Standardization | User info format undefined | Defines standard claims (sub, email, name, etc.) |
When implementing social login, most providers support OpenID Connect alongside OAuth 2.0, so using OIDC’s ID Token is a more standardized approach when user authentication is required.
Conclusion
OAuth 2.0 is the de facto standard for handling third-party authorization in modern web and mobile applications, and accurate understanding and proper implementation determine service security. Authorization Code Flow is the most secure flow but has implementation complexity, and adding PKCE allows it to be used safely even in public clients. Clearly separating frontend and backend responsibilities, securely managing Client Secrets and tokens, and always following the latest security best practices are the keys to successful OAuth implementation.